%20--%3e%3csvg%20version='1.1'%20xmlns='http://www.w3.org/2000/svg'%20x='0px'%20y='0px'%20viewBox='0%200%20207.3%2029'%20style='enable-background:new%200%200%20207.3%2029;'%20xml:space='preserve'%3e%3cstyle%20type='text/css'%3e%20.st0{fill:%231E293B;}%20.st1{fill:%232563eb;}%20%3c/style%3e%3cg%20id='Ebene_1'%3e%3cg%20id='Ebene_2_00000023959154727838081460000010218683892316788135_'%3e%3cg%3e%3cg%3e%3cpath%20class='st0'%20d='M24.3,7.4c0-0.8,0-1.5,0-2.2c0-0.6-0.4-1-1-1c-4.4,0-7.6-1.2-10.4-3.9c-0.4-0.3-1-0.3-1.5,0%20C8.7,2.9,5.4,4.1,1.1,4.1c-0.6,0-1,0.5-1,1c0,0.7,0,1.5,0,2.2c-0.2,7.4-0.4,17.3,11.8,21.6l0.3,0.1l0.3-0.1%20C24.6,24.6,24.4,14.7,24.3,7.4z%20M11.4,17.5C11.4,17.5,11.3,17.5,11.4,17.5c-0.3,0.2-0.5,0.3-0.8,0.3l0,0c-0.3,0-0.5-0.2-0.7-0.3%20l-2.7-3c-0.3-0.3-0.3-0.9,0.1-1.1L7.5,13c0.3-0.3,0.9-0.3,1.1,0.1l1.4,1.6c0.3,0.3,0.8,0.3,1.1,0.1l4.4-4.2%20c0.3-0.3,0.9-0.3,1.1,0l0.3,0.3c0.3,0.3,0.3,0.9,0,1.1L11.4,17.5z'/%3e%3c/g%3e%3c/g%3e%3c/g%3e%3c/g%3e%3cg%20id='Ebene_2'%3e%3cg%3e%3cpath%20class='st1'%20d='M46.3,8.6h-5.1v14.1h-2.8V8.6h-5.1V6.2h13V8.6z'/%3e%3cpath%20class='st1'%20d='M54.3,16.2h-3.2v6.3h-2.8V6.2h5.8c1.9,0,3.3,0.4,4.4,1.3S60,9.6,60,11.2c0,1.1-0.3,2-0.8,2.8%20c-0.5,0.7-1.3,1.3-2.2,1.7l3.7,6.8v0.2h-3L54.3,16.2z%20M51.1,13.9H54c1,0,1.7-0.2,2.2-0.7s0.8-1.1,0.8-2s-0.2-1.5-0.8-2%20C55.7,8.7,55,8.5,54,8.5h-3v5.4H51.1z'/%3e%3cpath%20class='st1'%20d='M74.3,6.2v10.9c0,1.7-0.6,3.1-1.7,4.1s-2.6,1.5-4.4,1.5c-1.9,0-3.4-0.5-4.5-1.5c-1.1-1-1.6-2.3-1.6-4.1V6.2%20h2.8v10.9c0,1.1,0.3,1.9,0.8,2.5c0.5,0.6,1.4,0.9,2.5,0.9c2.2,0,3.3-1.1,3.3-3.5V6.2H74.3z'/%3e%3cpath%20class='st1'%20d='M85.7,18.3c0-0.7-0.2-1.3-0.8-1.7c-0.5-0.4-1.4-0.8-2.7-1.2c-1.3-0.4-2.4-0.8-3.1-1.3%20c-1.5-0.9-2.2-2.2-2.2-3.7c0-1.3,0.5-2.4,1.6-3.3s2.5-1.3,4.2-1.3c1.1,0,2.2,0.2,3,0.6c0.8,0.4,1.6,1,2.1,1.8s0.8,1.6,0.8,2.6%20h-2.8c0-0.9-0.3-1.5-0.8-2s-1.3-0.7-2.3-0.7c-0.9,0-1.7,0.2-2.2,0.6s-0.8,1-0.8,1.7c0,0.6,0.3,1.1,0.8,1.5s1.5,0.8,2.7,1.2%20c1.2,0.4,2.3,0.8,3.1,1.3c0.8,0.5,1.3,1,1.7,1.7c0.4,0.6,0.5,1.4,0.5,2.2c0,1.4-0.5,2.5-1.6,3.2c-1,0.8-2.5,1.2-4.2,1.2%20c-1.2,0-2.3-0.2-3.3-0.7c-1-0.4-1.8-1-2.3-1.8s-0.8-1.7-0.8-2.7h2.8c0,0.9,0.3,1.6,0.9,2.2c0.6,0.6,1.5,0.8,2.6,0.8%20c1,0,1.7-0.2,2.2-0.6C85.4,19.5,85.7,19,85.7,18.3z'/%3e%3cpath%20class='st1'%20d='M102.6,8.6h-5.1v14.1h-2.8V8.6h-5.1V6.2h13V8.6z'/%3e%3cpath%20class='st0'%20d='M117,17.2c-0.2,1.7-0.8,3.1-1.9,4.1s-2.6,1.5-4.5,1.5c-1.3,0-2.4-0.3-3.4-0.9c-1-0.6-1.8-1.5-2.3-2.6%20c-0.5-1.1-0.8-2.5-0.8-4v-1.5c0-1.5,0.3-2.9,0.8-4.1s1.3-2.1,2.3-2.7s2.2-0.9,3.5-0.9c1.8,0,3.3,0.5,4.4,1.5s1.7,2.4,1.9,4.1h-2.8%20c-0.1-1.2-0.5-2-1-2.5c-0.6-0.5-1.4-0.8-2.4-0.8c-1.2,0-2.2,0.5-2.8,1.4c-0.7,0.9-1,2.2-1,4v1.5c0,1.8,0.3,3.1,0.9,4.1%20s1.6,1.4,2.8,1.4c1.1,0,1.9-0.2,2.5-0.8c0.6-0.5,0.9-1.3,1.1-2.5L117,17.2L117,17.2z'/%3e%3cpath%20class='st0'%20d='M128.5,18.8h-6.4l-1.3,3.8h-2.9l6.2-16.4h2.6l6.2,16.4h-3L128.5,18.8z%20M122.9,16.5h4.7l-2.4-6.8L122.9,16.5z'%20/%3e%3cpath%20class='st0'%20d='M137.2,16.5v6.1h-2.8V6.2h6.3c1.8,0,3.3,0.5,4.3,1.4c1.1,1,1.6,2.2,1.6,3.8c0,1.6-0.5,2.9-1.6,3.7%20c-1.1,0.8-2.5,1.3-4.4,1.3C140.6,16.4,137.2,16.4,137.2,16.5z%20M137.2,14.2h3.4c1,0,1.8-0.2,2.3-0.7s0.8-1.2,0.8-2.1%20s-0.3-1.6-0.8-2.1s-1.3-0.8-2.2-0.8h-3.5C137.2,8.6,137.2,14.2,137.2,14.2z'/%3e%3cpath%20class='st0'%20d='M160.7,8.6h-5.1v14.1h-2.8V8.6h-5.1V6.2h13V8.6L160.7,8.6z'/%3e%3cpath%20class='st0'%20d='M175.1,17.2c-0.2,1.7-0.8,3.1-1.9,4.1c-1.1,1-2.6,1.5-4.5,1.5c-1.3,0-2.4-0.3-3.4-0.9c-1-0.6-1.8-1.5-2.3-2.6%20c-0.5-1.1-0.8-2.5-0.8-4v-1.5c0-1.5,0.3-2.9,0.8-4.1s1.3-2.1,2.4-2.7c1-0.6,2.2-0.9,3.5-0.9c1.8,0,3.3,0.5,4.4,1.5%20s1.7,2.4,1.9,4.1h-2.8c-0.1-1.2-0.5-2-1-2.5S170,8.4,169,8.4c-1.2,0-2.2,0.5-2.9,1.4s-1,2.2-1,4v1.5c0,1.8,0.3,3.1,0.9,4.1%20c0.6,0.9,1.6,1.4,2.8,1.4c1.1,0,1.9-0.2,2.5-0.8c0.6-0.5,0.9-1.3,1.1-2.5L175.1,17.2L175.1,17.2z'/%3e%3cpath%20class='st0'%20d='M190.4,22.5h-2.8v-7.2h-7.3v7.2h-2.8V6.2h2.8v6.8h7.3V6.2h2.8V22.5z'/%3e%3cpath%20class='st0'%20d='M202.8,18.8h-6.3l-1.3,3.8h-2.9l6.2-16.4h2.6l6.2,16.4h-3L202.8,18.8z%20M197.3,16.5h4.7l-2.4-6.8L197.3,16.5z'%20/%3e%3c/g%3e%3c/g%3e%3c/svg%3e)
'%3e%3crect%20width='32'%20height='24'%20fill='white'/%3e%3cpath%20fill-rule='evenodd'%20clip-rule='evenodd'%20d='M0%200V24H32V0H0Z'%20fill='%232E42A5'/%3e%3cmask%20id='mask0_270_67386'%20style='mask-type:luminance'%20maskUnits='userSpaceOnUse'%20x='0'%20y='0'%20width='32'%20height='24'%3e%3cpath%20fill-rule='evenodd'%20clip-rule='evenodd'%20d='M0%200V24H32V0H0Z'%20fill='white'/%3e%3c/mask%3e%3cg%20mask='url(%23mask0_270_67386)'%3e%3cpath%20d='M-3.56323%2022.2854L3.47846%2025.2635L32.1597%203.23787L35.874%20-1.18761L28.344%20-2.18297L16.6456%207.3085L7.22956%2013.7035L-3.56323%2022.2854Z'%20fill='white'/%3e%3cpath%20d='M-2.59924%2024.3719L0.988173%2026.1001L34.5402%20-1.59881H29.5031L-2.59924%2024.3719Z'%20fill='%23F50100'/%3e%3cpath%20d='M35.5631%2022.2854L28.5214%2025.2635L-0.159817%203.23787L-3.87415%20-1.18761L3.65593%20-2.18297L15.3543%207.3085L24.7703%2013.7035L35.5631%2022.2854Z'%20fill='white'/%3e%3cpath%20d='M35.3229%2023.7829L31.7355%2025.5111L17.4487%2013.6518L13.2129%2012.3267L-4.23151%20-1.17246H0.805637L18.2403%2012.0063L22.8713%2013.5952L35.3229%2023.7829Z'%20fill='%23F50100'/%3e%3cmask%20id='path-7-inside-1_270_67386'%20fill='white'%3e%3cpath%20fill-rule='evenodd'%20clip-rule='evenodd'%20d='M19.7777%20-2H12.2222V8H-1.97253V16H12.2222V26H19.7777V16H34.0275V8H19.7777V-2Z'/%3e%3c/mask%3e%3cpath%20fill-rule='evenodd'%20clip-rule='evenodd'%20d='M19.7777%20-2H12.2222V8H-1.97253V16H12.2222V26H19.7777V16H34.0275V8H19.7777V-2Z'%20fill='%23F50100'/%3e%3cpath%20d='M12.2222%20-2V-4H10.2222V-2H12.2222ZM19.7777%20-2H21.7777V-4H19.7777V-2ZM12.2222%208V10H14.2222V8H12.2222ZM-1.97253%208V6H-3.97253V8H-1.97253ZM-1.97253%2016H-3.97253V18H-1.97253V16ZM12.2222%2016H14.2222V14H12.2222V16ZM12.2222%2026H10.2222V28H12.2222V26ZM19.7777%2026V28H21.7777V26H19.7777ZM19.7777%2016V14H17.7777V16H19.7777ZM34.0275%2016V18H36.0275V16H34.0275ZM34.0275%208H36.0275V6H34.0275V8ZM19.7777%208H17.7777V10H19.7777V8ZM12.2222%200H19.7777V-4H12.2222V0ZM14.2222%208V-2H10.2222V8H14.2222ZM-1.97253%2010H12.2222V6H-1.97253V10ZM0.0274658%2016V8H-3.97253V16H0.0274658ZM12.2222%2014H-1.97253V18H12.2222V14ZM14.2222%2026V16H10.2222V26H14.2222ZM19.7777%2024H12.2222V28H19.7777V24ZM17.7777%2016V26H21.7777V16H17.7777ZM34.0275%2014H19.7777V18H34.0275V14ZM32.0275%208V16H36.0275V8H32.0275ZM19.7777%2010H34.0275V6H19.7777V10ZM17.7777%20-2V8H21.7777V-2H17.7777Z'%20fill='white'%20mask='url(%23path-7-inside-1_270_67386)'/%3e%3c/g%3e%3c/g%3e%3cdefs%3e%3cclipPath%20id='clip0_270_67386'%3e%3crect%20width='32'%20height='24'%20fill='white'/%3e%3c/clipPath%3e%3c/defs%3e%3c/svg%3e)
'%3e%3crect%20width='32'%20height='24'%20fill='white'/%3e%3cpath%20fill-rule='evenodd'%20clip-rule='evenodd'%20d='M0%2016H32V24H0V16Z'%20fill='%23FFD018'/%3e%3cpath%20fill-rule='evenodd'%20clip-rule='evenodd'%20d='M0%208H32V16H0V8Z'%20fill='%23E31D1C'/%3e%3cpath%20fill-rule='evenodd'%20clip-rule='evenodd'%20d='M0%200H32V8H0V0Z'%20fill='%23272727'/%3e%3c/g%3e%3cdefs%3e%3cclipPath%20id='clip0_270_67353'%3e%3crect%20width='32'%20height='24'%20fill='white'/%3e%3c/clipPath%3e%3c/defs%3e%3c/svg%3e)
'%3e%3crect%20width='32'%20height='24'%20fill='white'/%3e%3cpath%20fill-rule='evenodd'%20clip-rule='evenodd'%20d='M22%200H32V24H22V0Z'%20fill='%23F50100'/%3e%3cpath%20fill-rule='evenodd'%20clip-rule='evenodd'%20d='M0%200H12V24H0V0Z'%20fill='%232E42A5'/%3e%3cpath%20fill-rule='evenodd'%20clip-rule='evenodd'%20d='M10%200H22V24H10V0Z'%20fill='%23F7FCFF'/%3e%3c/g%3e%3cdefs%3e%3cclipPath%20id='clip0_270_67361'%3e%3crect%20width='32'%20height='24'%20fill='white'/%3e%3c/clipPath%3e%3c/defs%3e%3c/svg%3e)

NestJS CAPTCHA Integration
Wire TrustCaptcha into a NestJS controller or guard in just a few lines of TypeScript. Stop bot-driven spam on logins, signups and contact forms — with full DI support, ConfigModule integration and type-safe DTOs. EU-hosted, GDPR-ready, no image puzzles.
Quickstart
How the integration works
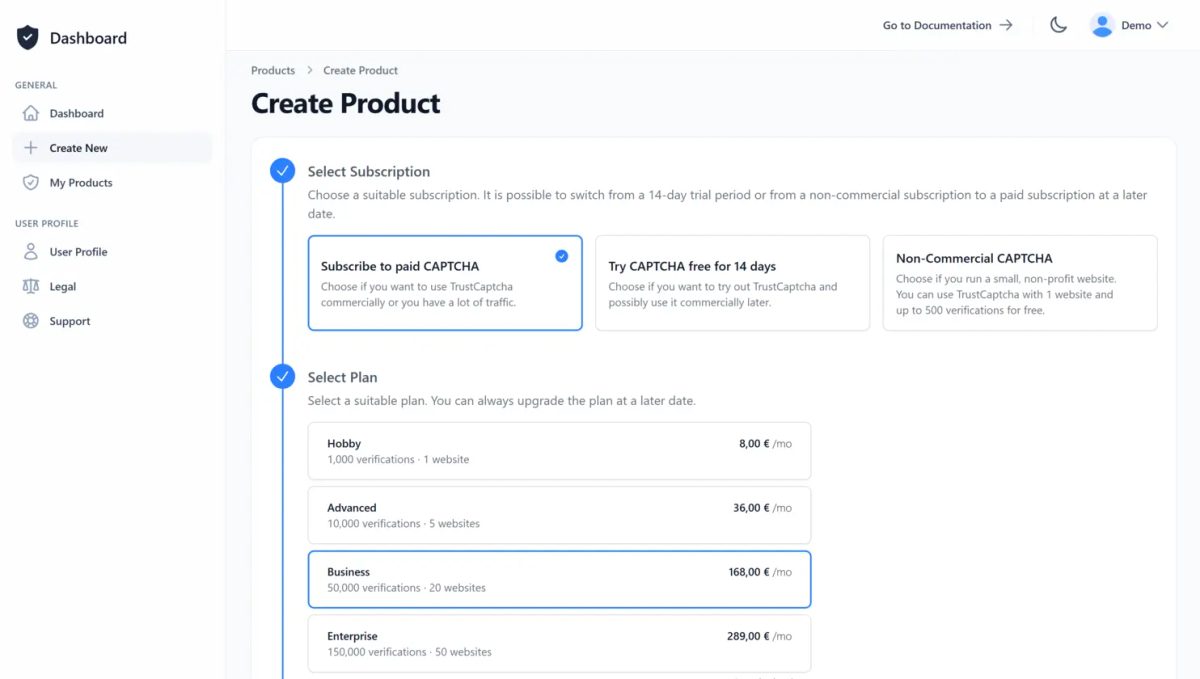
1. Create a CAPTCHA
Create a user account or log in with an existing one. Then create a new CAPTCHA or select an existing one. If you’re unsure whether TrustCaptcha is right for you, try our CAPTCHA service risk-free for 14 days at no cost.
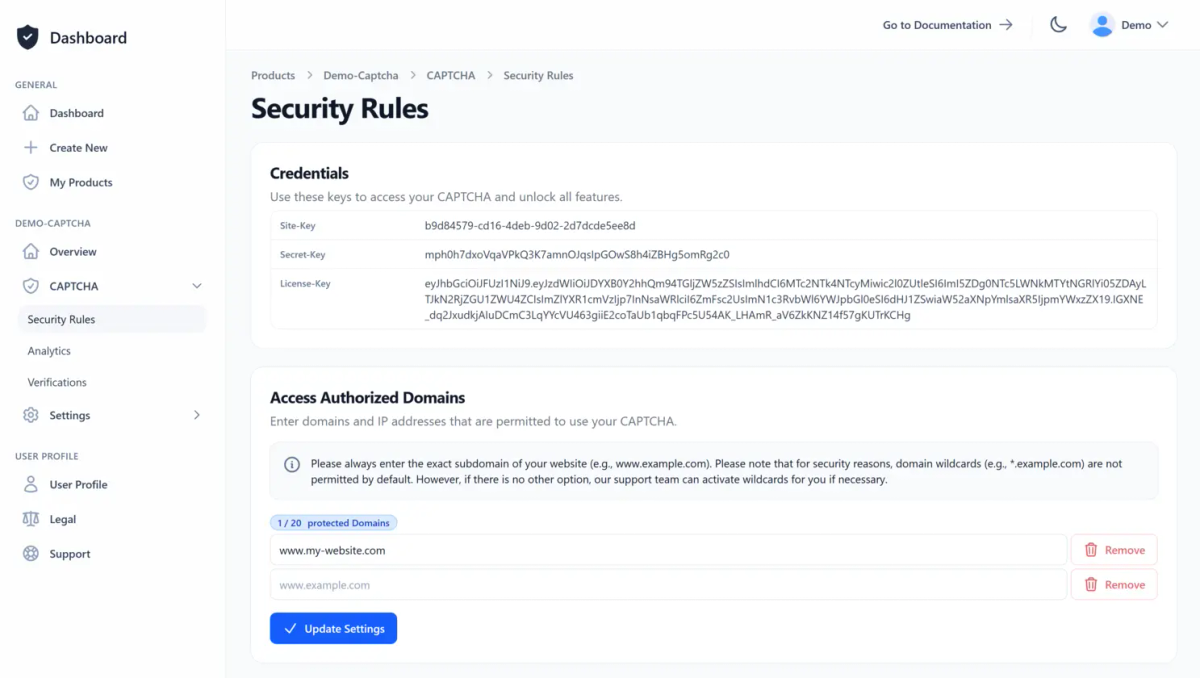
On the CAPTCHA overview page, you will find all the important information, such as the site key and licence key, and you can also create your API key. Allow your websites to access your CAPTCHA by simply adding them to the access authorised domain list in the CAPTCHA security rules.
2. Add the CAPTCHA widget to your form
Drop the TrustCaptcha widget into the HTML form your NestJS controller serves. The widget runs the CAPTCHA in the background and adds a hidden tc-verification-token field on submit, which arrives on req.body like any other input.
<script type="module" src="https://cdn.trustcomponent.com/trustcaptcha/3.0.x/trustcaptcha.esm.min.js"></script>

<form method="post" action="/contact">
    <input type="email" name="email" required>
    <trustcaptcha-component sitekey="<your_site_key>"></trustcaptcha-component>
    <button type="submit">Send</button>
</form>
The CAPTCHA widget will then be displayed inside your form:

Need detailed information about the CAPTCHA widget integration?
For the full widget reference — including themes, languages, custom design and more — please read our documentation.
Read the documentation
3. Validate the token in your NestJS controller
In your NestJS controller, take the verification token from the request body, look up the result via our Node.js library, and decide whether to accept the request.
First, install our TrustCaptcha Node.js library:
npm i @trustcomponent/trustcaptcha-nodejsThen validate the token inside your NestJS controller and act on the result:
import { BadRequestException, Body, Controller, Post } from "@nestjs/common";
import { TrustCaptcha } from "@trustcomponent/trustcaptcha-nodejs";

@Controller("contact")
export class ContactController {
  @Post()
  async submit(@Body() body: { "tc-verification-token": string }) {
    const token = body["tc-verification-token"] ?? "";

    try {
      const result = await TrustCaptcha.getVerificationResult("<your_api_key>", token);
      if (!result.verificationPassed || result.score > 0.5) {
        throw new BadRequestException("CAPTCHA verification failed.");
      }
    } catch {
      throw new BadRequestException("CAPTCHA verification failed.");
    }

    // CAPTCHA passed — process the request
    return { status: "ok" };
  }
}
Need detailed information about the NestJS CAPTCHA integration?
For full step-by-step instructions — including a reusable Guard refactor for projects with several protected endpoints — please read our documentation.
Read the documentation
Other backend framework instead of NestJS?
If you use a different framework, pick the matching recipe here. If your framework isn’t listed, your software developers can integrate the verification themselves using our documentation or ask our support team for a pre-built integration.


'%20gradientUnits='userSpaceOnUse'%20r='14'%3e%3cstop%20offset='0'%20stop-color='%237d7d7d'/%3e%3cstop%20offset='.267'%20stop-color='%237e7c7a'/%3e%3cstop%20offset='.45'%20stop-color='%23817871'/%3e%3cstop%20offset='.608'%20stop-color='%23867162'/%3e%3cstop%20offset='.753'%20stop-color='%238d684c'/%3e%3cstop%20offset='.886'%20stop-color='%23965c30'/%3e%3cstop%20offset='1'%20stop-color='%23a04f12'/%3e%3c/radialGradient%3e%3cpath%20d='m15.124%205.3a.832.832%200%201%201%20.832.832.832.832%200%200%201%20-.832-.832m-9.924%207.534a.832.832%200%201%201%20.832.832.832.832%200%200%201%20-.832-.832m19.856.039a.832.832%200%201%201%20.832.832.832.832%200%200%201%20-.832-.832m-17.451%201.14a.76.76%200%200%200%20.386-1l-.369-.835h1.452v6.545h-2.93a10.246%2010.246%200%200%201%20-.332-3.911zm6.074.161v-1.929h3.458c.179%200%201.261.206%201.261%201.016%200%20.672-.83.913-1.513.913zm-4.721%2010.387a.832.832%200%201%201%20.832.832.832.832%200%200%201%20-.832-.832m12.331.039a.832.832%200%201%201%20.832.832.832.832%200%200%201%20-.832-.832m.257-1.887a.759.759%200%200%200%20-.9.584l-.418%201.949a10.246%2010.246%200%200%201%20-8.545-.041l-.417-1.949a.758.758%200%200%200%20-.9-.583l-1.721.37a10.246%2010.246%200%200%201%20-.89-1.049h8.374c.095%200%20.158-.017.158-.1v-2.966c0-.086-.063-.1-.158-.1h-2.45v-1.881h2.649a1.665%201.665%200%200%201%201.629%201.412c.105.413.336%201.757.494%202.187.157.483.8%201.447%201.482%201.447h4.323a10.246%2010.246%200%200%201%20-.949%201.1zm4.65-7.821a10.246%2010.246%200%200%201%20.022%201.779h-1.051c-.105%200-.148.069-.148.172v.483c0%201.136-.641%201.384-1.2%201.447-.535.06-1.128-.224-1.2-.551a3.616%203.616%200%200%200%20-1.671-2.808c1.03-.654%202.1-1.619%202.1-2.911a3.293%203.293%200%200%200%20-1.608-2.7%204.562%204.562%200%200%200%20-2.2-.724h-10.873a10.246%2010.246%200%200%201%205.733-3.239l1.282%201.344a.758.758%200%200%200%201.073.025l1.434-1.372a10.246%2010.246%200%200%201%207.015%205l-.982%202.217a.761.761%200%200%200%20.386%201zm2.448.036-.033-.343%201.011-.943a.421.421%200%200%200%20-.134-.676l-1.288-.483-.1-.334.806-1.12a.421.421%200%200%200%20-.263-.636l-1.363-.222-.164-.306.573-1.257a.419.419%200%200%200%20-.382-.573l-1.383.048-.224-.264.318-1.347a.421.421%200%200%200%20-.487-.487l-1.348.315-.266-.219.049-1.381a.421.421%200%200%200%20-.572-.383l-1.257.573-.306-.164-.222-1.363a.421.421%200%200%200%20-.636-.263l-1.121.806-.333-.1-.483-1.293a.421.421%200%200%200%20-.675-.135l-.943%201.012-.343-.033-.728-1.177a.421.421%200%200%200%20-.688%200l-.728%201.177-.343.033-.943-1.012a.421.421%200%200%200%20-.675.135l-.487%201.287-.333.1-1.12-.8a.421.421%200%200%200%20-.636.263l-.222%201.363-.306.164-1.258-.573a.42.42%200%200%200%20-.572.383l.048%201.383-.266.217-1.347-.316a.421.421%200%200%200%20-.487.487l.316%201.348-.218.265-1.382-.048a.422.422%200%200%200%20-.383.573l.573%201.257-.164.306-1.363.222a.421.421%200%200%200%20-.263.636l.806%201.12-.1.334-1.293.483a.421.421%200%200%200%20-.134.676l1.011.943-.033.343-1.177.728a.421.421%200%200%200%200%20.688l1.177.728.033.343-1.011.943a.421.421%200%200%200%20.134.675l1.293.483.1.334-.806%201.121a.421.421%200%200%200%20.264.636l1.363.222.164.307-.573%201.257a.421.421%200%200%200%20.383.573l1.383-.048.219.266-.317%201.348a.42.42%200%200%200%20.487.486l1.345-.319.266.218-.049%201.382a.42.42%200%200%200%20.572.382l1.257-.573.306.164.222%201.362a.421.421%200%200%200%20.636.264l1.12-.807.334.1.483%201.292a.421.421%200%200%200%20.675.134l.943-1.011.343.034.728%201.177a.422.422%200%200%200%20.688%200l.728-1.177.343-.034.943%201.011a.421.421%200%200%200%20.675-.134l.483-1.292.334-.1%201.12.807a.421.421%200%200%200%20.636-.264l.222-1.362.306-.164%201.257.573a.42.42%200%200%200%20.572-.382l-.048-1.384.265-.218%201.347.317a.42.42%200%200%200%20.487-.486l-.312-1.346.218-.266%201.383.048a.421.421%200%200%200%20.382-.573l-.573-1.257.164-.307%201.363-.222a.42.42%200%200%200%20.263-.636l-.806-1.12.1-.334%201.293-.483a.42.42%200%200%200%20.134-.675l-1.011-.943.033-.343%201.177-.728a.421.421%200%200%200%200-.688z'%20fill='url(%23a)'/%3e%3c/svg%3e)


'%20d='M106.317%20112.014%2049.167%2038.4H38.4v51.179h8.614v-40.24l52.54%2067.884a64.216%2064.216%200%200%200%206.763-5.209z'/%3e%3cpath%20fill='url(%23b)'%20d='M81.778%2038.4h8.533v51.2h-8.533z'/%3e%3cdefs%3e%3clinearGradient%20id='a'%20x1='109'%20x2='144.5'%20y1='116.5'%20y2='160.5'%20gradientTransform='scale(.71111)'%20gradientUnits='userSpaceOnUse'%3e%3cstop%20stop-color='%23fff'/%3e%3cstop%20offset='1'%20stop-color='%23fff'%20stop-opacity='0'/%3e%3c/linearGradient%3e%3clinearGradient%20id='b'%20x1='121'%20x2='120.799'%20y1='54'%20y2='106.875'%20gradientTransform='scale(.71111)'%20gradientUnits='userSpaceOnUse'%3e%3cstop%20stop-color='%23fff'/%3e%3cstop%20offset='1'%20stop-color='%23fff'%20stop-opacity='0'/%3e%3c/linearGradient%3e%3c/defs%3e%3c/svg%3e)


'%20gradientUnits='userSpaceOnUse'%3e%3cstop%20offset='.694'%20stop-color='%23afadae'/%3e%3cstop%20offset='.968'%20stop-color='%23afadae'%20stop-opacity='0'/%3e%3c/radialGradient%3e%3cpath%20fill='url(%23SVGDCoj9d3D)'%20d='M5%20123c0-27.8%2056.2-50.3%20125.5-50.3S256%2095.2%20256%20123s-56.2%2050.3-125.5%2050.3C61.2%20173.4%205%20150.8%205%20123'/%3e%3cradialGradient%20id='SVGr91dAJqS'%20cx='178.61'%20cy='90.852'%20r='177.391'%20gradientTransform='matrix(-.9856%20.1689%20-.09166%20-.535%20362.983%20109.296)'%20gradientUnits='userSpaceOnUse'%3e%3cstop%20offset='.476'%20stop-color='%23f3efe9'/%3e%3cstop%20offset='.568'%20stop-color='%23eeeae3'/%3e%3cstop%20offset='.688'%20stop-color='%23e1dbd2'/%3e%3cstop%20offset='.824'%20stop-color='%23cdc5b7'/%3e%3cstop%20offset='.963'%20stop-color='%23b4aa98'/%3e%3c/radialGradient%3e%3cpath%20fill='url(%23SVGr91dAJqS)'%20d='M2.9%20127.8s-20.6-40%2047.4-62.4C82.1%2054.9%20119.4%2048%20152.7%2046.8c38-1.3%2071.7%205.3%2086.4%2027.7c10.6%2016.2%204.2%2036-16.3%2051.4c-12.3%209.2-39.3%2018.4-57.3%2023.6c-18%205.1-53.3%2012-82.2%2010.4s-64.8-5.8-80.4-32.1'/%3e%3cpath%20fill='%23cec7bc'%20d='M2.9%20127.8s-20.6-40%2047.4-62.4C82.1%2054.9%20119.4%2048%20152.7%2046.8c38-1.3%2071.7%205.3%2086.4%2027.7c10.6%2016.2%204.2%2036-16.3%2051.4c-12.3%209.2-39.3%2018.4-57.3%2023.6c-18%205.1-53.3%2012-82.2%2010.4s-64.8-5.8-80.4-32.1m81%2030.9c28.2%201.6%2062.6-5.2%2080.1-10.2s44.2-13.6%2056.2-22.6c20-15%2028.1-33.7%2016.9-50.9c-14.2-22-48.7-28.8-85.7-27.5c-32.4%201.1-68.8%208.8-99.8%2019c-66.3%2021.9-46.2%2060.9-46.2%2060.9c15.3%2025.6%2050.3%2029.7%2078.5%2031.3'/%3e%3clinearGradient%20id='SVGV0R5xcIw'%20x1='53.662'%20x2='197.066'%20y1='47.58'%20y2='58.425'%20gradientUnits='userSpaceOnUse'%3e%3cstop%20offset='.094'%20stop-color='%23d7d0c6'/%3e%3cstop%20offset='.248'%20stop-color='%23cdc7bb'/%3e%3cstop%20offset='.401'%20stop-color='%23c7c2b5'/%3e%3cstop%20offset='.525'%20stop-color='%23cbc6ba'/%3e%3cstop%20offset='.669'%20stop-color='%23d7d1c7'/%3e%3cstop%20offset='.78'%20stop-color='%23e6dfd6'/%3e%3cstop%20offset='.892'%20stop-color='%23e7e3d9'/%3e%3cstop%20offset='.934'%20stop-color='%23e5dfd3'/%3e%3cstop%20offset='.98'%20stop-color='%23dfd5c6'/%3e%3c/linearGradient%3e%3cpath%20fill='url(%23SVGV0R5xcIw)'%20d='M57.3%2095.9c-5.9-4.3-14.2-25.4-11-30s8-14.2%2010.7-23.6c2.7-9.3%206.5-29.1%2014-36.1s18.7-7%2033.5-5.4c14.7%201.6%2057.8%209.4%2068.3%2013.1c10.4%203.7%2024%2010.7%2023.2%2027s.7%2024.4-1.2%2033.5s-21.7%2026.8-46.6%2028.1c-25%201.5-85-2.3-90.9-6.6'/%3e%3cradialGradient%20id='SVGMYSYVsVW'%20cx='110.123'%20cy='23.771'%20r='53.767'%20gradientTransform='rotate(84.941%20132.128%2043.915)scale(1%202.6947)'%20gradientUnits='userSpaceOnUse'%3e%3cstop%20offset='.067'%20stop-color='%23b2a797'/%3e%3cstop%20offset='.29'%20stop-color='%23c7bdae'/%3e%3cstop%20offset='.481'%20stop-color='%23d6cebf'/%3e%3cstop%20offset='.688'%20stop-color='%23e2dcd0'/%3e%3cstop%20offset='.942'%20stop-color='%23f7f5ee'/%3e%3c/radialGradient%3e%3cpath%20fill='url(%23SVGMYSYVsVW)'%20d='M127.8%2075.8s25.7-3.4%2041.2-17.9s1.8-24.9-2.4-27.5S148.3%2021%20126%2022s-44.3%201.2-42.8%2017.7c1.5%2016.4%2019.5%2036.1%2044.6%2036.1'/%3e%3clinearGradient%20id='SVGaA6utbiG'%20x1='69.277'%20x2='177.061'%20y1='15.553'%20y2='15.553'%20gradientUnits='userSpaceOnUse'%3e%3cstop%20offset='.056'%20stop-color='%23f7f5ee'/%3e%3cstop%20offset='.226'%20stop-color='%23e6e1d6'/%3e%3cstop%20offset='.43'%20stop-color='%23d8d1c3'/%3e%3cstop%20offset='.639'%20stop-color='%23d0c8b9'/%3e%3cstop%20offset='.857'%20stop-color='%23cec5b5'/%3e%3c/linearGradient%3e%3cpath%20fill='url(%23SVGaA6utbiG)'%20d='M71%2026.2c-2.8-1.8-3.2-11.6%207.2-18.3c10.4-6.6%2037.2-2.6%2054.6%201.6c17.5%204.2%2045.7%2010.1%2044.2%2011.7c-1.5%201.5-43.5-3.6-62.7-2.6C88.2%2020%2075.4%2029%2071%2026.2'/%3e%3clinearGradient%20id='SVGUxwpOefo'%20x1='42.47'%20x2='196.375'%20y1='94.53'%20y2='94.53'%20gradientUnits='userSpaceOnUse'%3e%3cstop%20offset='.018'%20stop-color='%23262222'/%3e%3cstop%20offset='.096'%20stop-color='%232f2c2c'/%3e%3cstop%20offset='.3'%20stop-color='%23424143'/%3e%3cstop%20offset='.402'%20stop-color='%234a4a4c'/%3e%3cstop%20offset='.514'%20stop-color='%234a4a4c'/%3e%3cstop%20offset='.78'%20stop-color='%23383536'/%3e%3cstop%20offset='1'%20stop-color='%23262222'/%3e%3c/linearGradient%3e%3cpath%20fill='url(%23SVGUxwpOefo)'%20d='M195.6%2071.7c-.3%200-.4.9-.8%201.4c-3.3%205.4-13.1%2014.6-35.4%2014.6H98.8c-38.2%200-49.3-10.3-52.1-17.7c-.2-.7-.5-1.6-.8-1.6s-.5%201.6-.5%201.6l-2.9%2027.7c0%2012.7%2032.9%2023%2075.2%2023s78.6-6%2078.6-23c0%200%20.2-16.9.1-24.4c0-.8-.1-1.6-.8-1.6'/%3e%3c/svg%3e)


4. Congratulations 🎉
You are now protected by TrustCaptcha - congratulations!

FAQs
Where in a NestJS app does the CAPTCHA verification go?
Should I use a guard, an interceptor or just call the verification in the controller?
How do I share the API key across the app?
Does NestJS' ValidationPipe interfere with the CAPTCHA token?
Do I need to configure body parsing manually?
TrustCaptcha blocks spam and bots, not customers. No puzzles, GDPR-ready, EU-hosted.


Protect your NestJS application with TrustCaptcha in just a few steps!
- EU-hosted & GDPR-ready
- No puzzles
- Try free for 14 days